Pro plan block. The Attribute Meter Block is available on the Pro plan. Free plan stores will see this block locked in the Theme Editor until they upgrade.
What Is the Attribute Meter Block?
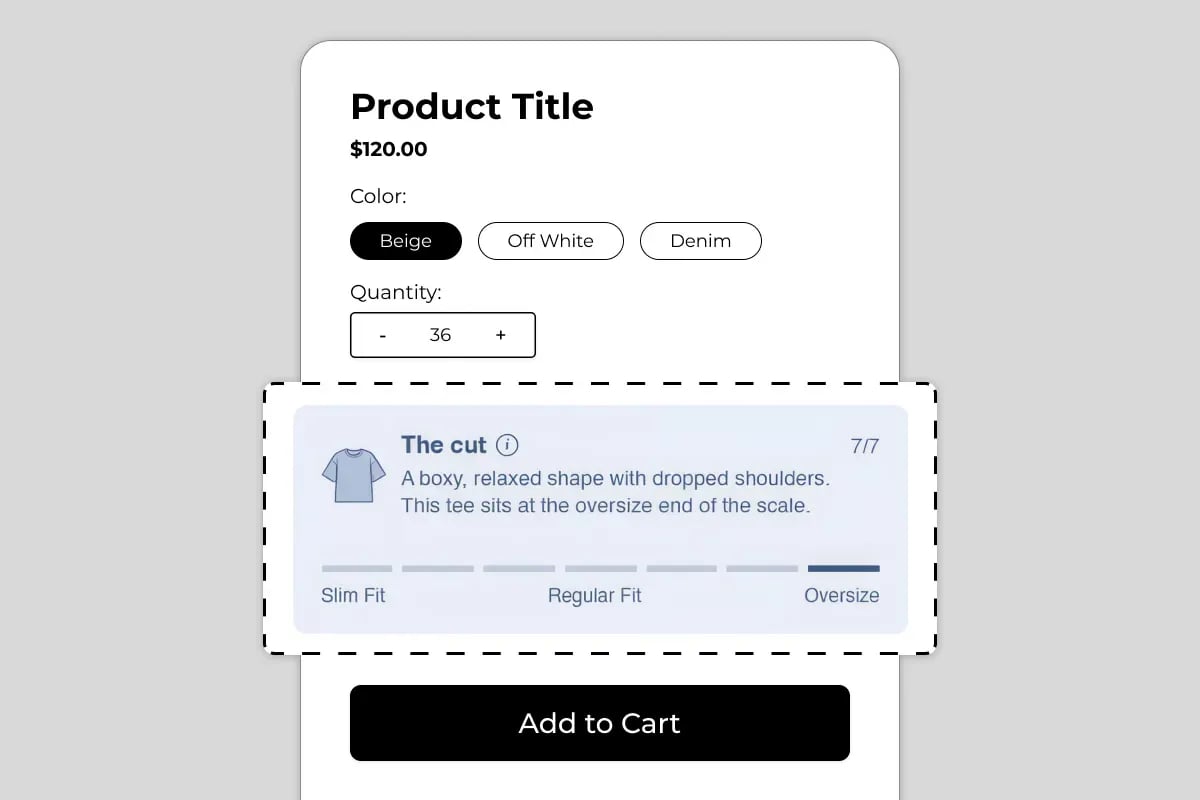
7/7 indicator in the top-right corner shows the shopper can page through several attributes (fit, stretch, thickness, warmth, and so on) for the same product.
How It Works: Tag-Based Automation
The defining feature of this block is that it is not manually set per product. Instead, it dynamically adjusts the active level on the meter by automatically reading the product’s assigned tags in Shopify. This means:- You define the meter once — the scale, the labels, the number of segments, and the explanation text for each level
-
You then tag each product with the attribute level that applies to it — for example,
fit:oversize,fit:slim, orfit:regular - The block reads the tag on each product page and automatically highlights the correct segment on the meter — no manual configuration per product
- As you add new products, simply tag them correctly and the meter displays the right level automatically, with zero additional setup
Why It Matters for Conversion
Shoppers abandon product pages when they are uncertain about a characteristic that matters to their decision — most commonly fit, sizing, intensity, or strength. Long paragraphs of descriptive text are often skimmed or skipped entirely, which means the information that would have prevented a hesitation (or a return) never actually gets through. A segmented meter solves this instantly:- It is scannable in under a second — no reading required
- It gives the shopper a relative reference point (not just “oversize,” but where oversize sits on the full spectrum from slim to oversize)
- It reduces size- and fit-related returns, because expectations are set accurately before purchase
- It works for any binary or spectrum attribute — fit, scent strength, spiciness level, material stretch, sound volume, screen brightness, and more
How to Add the Attribute Meter Block
- Go to Online Store → Themes in your Shopify admin
- Click Customize on your active theme
- Using the top dropdown, open your product template
- In the left sidebar, click Add block
- Under Apps, select Iconic Blocks → Attribute Meter
- The block appears in your layout — configure it in the right sidebar
- Drag the block to your preferred position in the left sidebar
- Click Save
Key Settings
Attribute Name The label for the characteristic being measured — for example, The Cut, Stretch, Scent Strength, or Spice Level. This appears as the heading of the meter. Scale Labels The text shown at each end of the meter (and optionally at intermediate points) — for example, Slim Fit to Oversize, or Mild to Extra Hot. Keep these short — one or two words each — so they stay readable at every screen size. Number of Segments How many steps the meter is divided into. More segments allow for finer-grained differentiation between products; fewer segments keep the scale simple and easy to read at a glance. Level Description The explanatory sentence shown below the meter for the active level — for example, “A boxy, relaxed shape with dropped shoulders. This tee sits at the oversize end of the scale.” Write one description per possible level so the correct text displays automatically alongside the correct segment. Tag Mapping The Shopify product tag that corresponds to each level on the meter. This is what connects your product catalog to the meter — tag a product correctly in Shopify admin and the block does the rest. Multiple Attributes Toggle If a product has more than one attribute meter configured (as shown by the7/7 counter in the example), shoppers can page through them using arrows or swipe. Enable this if you are measuring more than one characteristic for the same product line.
Active Segment Color The color used to highlight the active segment and the connecting bar. Use a color with enough contrast against the inactive (gray) segments so the active level is immediately identifiable.
Info Tooltip An optional (i) icon next to the attribute name that reveals additional context when tapped — useful for explaining how the scale is measured or what methodology was used.
Setting Up Tags Correctly
The block is only as accurate as your tagging. Before publishing:-
Decide on a consistent tag naming convention — for example,
fit:slim,fit:regular,fit:oversize - Apply the correct tag to every product that uses this attribute meter, via Shopify Admin → Products → [Product] → Tags
- Map each tag to its corresponding segment in the block’s Tag Mapping setting
- Preview a product from each tag level to confirm the meter highlights the correct segment
- For products with no matching tag, decide whether the meter should hide entirely or fall back to a default level — check the block’s fallback setting
Placement Strategy
Best position: Below the product description or near sizing information This is where shoppers are actively trying to understand fit or intensity before committing. Placing the meter here answers the question at the exact moment it is being asked. Also effective: Directly below the variant selectors (color, size) Shoppers evaluating which variant to choose benefit from seeing the attribute meter alongside their selection, especially for fit-related attributes. Avoid placing it:- Above the product title — this is supporting detail, not a headline feature
- Buried below reviews, where shoppers who needed this information to decide have likely already left the page
Best Practices
- Keep scale labels short and universally understood. Slim Fit to Oversize is instantly clear. Avoid internal or brand-specific jargon that shoppers will not recognize.
- Tag consistently across your entire catalog. A meter that is accurate for some products and missing or wrong for others undermines shopper trust in the feature. Build tagging into your standard product upload checklist.
- Write a specific level description, not a generic one. “This tee sits at the oversize end of the scale” tells the shopper something concrete. “This product is oversized” repeats the label without adding value.
- Use the same number of segments across meters for the same attribute type. If your Fit meter uses 7 segments, keep all Fit meters at 7 segments across your catalog so shoppers develop a consistent mental model of the scale.
- Reserve the meter for attributes that genuinely vary by product. If every product in a collection is identical on a given attribute, the meter adds clutter rather than value — use it only where it differentiates.
Common Mistakes
Inconsistent or missing tags If a product is not tagged, or is tagged incorrectly, the meter will show the wrong level or fail to display. Audit your product tags whenever this block is in use, especially after bulk product imports. Too many segments for the attribute being measured A 10-segment meter for an attribute with only two realistic states (e.g., Stretch / No Stretch) adds unnecessary complexity. Match the segment count to the real granularity of the attribute. Vague scale labels Labels like Low and High without context leave shoppers guessing what is actually being measured. Always pair the meter with a clear attribute name and, where useful, the info tooltip. Using the block for attributes that do not vary If every product has the same value for an attribute, there is no decision-making value in showing a meter — remove it for that product type.Troubleshooting
The meter shows the wrong level on a specific product- Cause: The product’s tag does not match the Tag Mapping configured in the block, or the product has multiple conflicting tags for the same attribute.
- Solution: Go to Shopify Admin → Products → [Product] → Tags and verify only one correct tag is applied for this attribute. Confirm the tag spelling exactly matches the Tag Mapping in the block settings.
- Cause: The product has no matching tag, or the block was not saved to the correct product template.
- Solution: Confirm the product has a tag that matches one of the configured levels. Then go to Online Store → Themes → Customize, open the correct product template, confirm the block is present, and click Save.
- Cause: The live page may be showing a cached version.
- Solution: Hard refresh the live product page in a private or incognito browser window after updating the tag.
- Cause: The Multiple Attributes Toggle may be disabled, or only one attribute meter has been configured for the product.
- Solution: Confirm the toggle is enabled in the block settings and that more than one attribute meter configuration exists for the product’s tags.