

Delivery Info Block
What Is the Delivery Info Block?
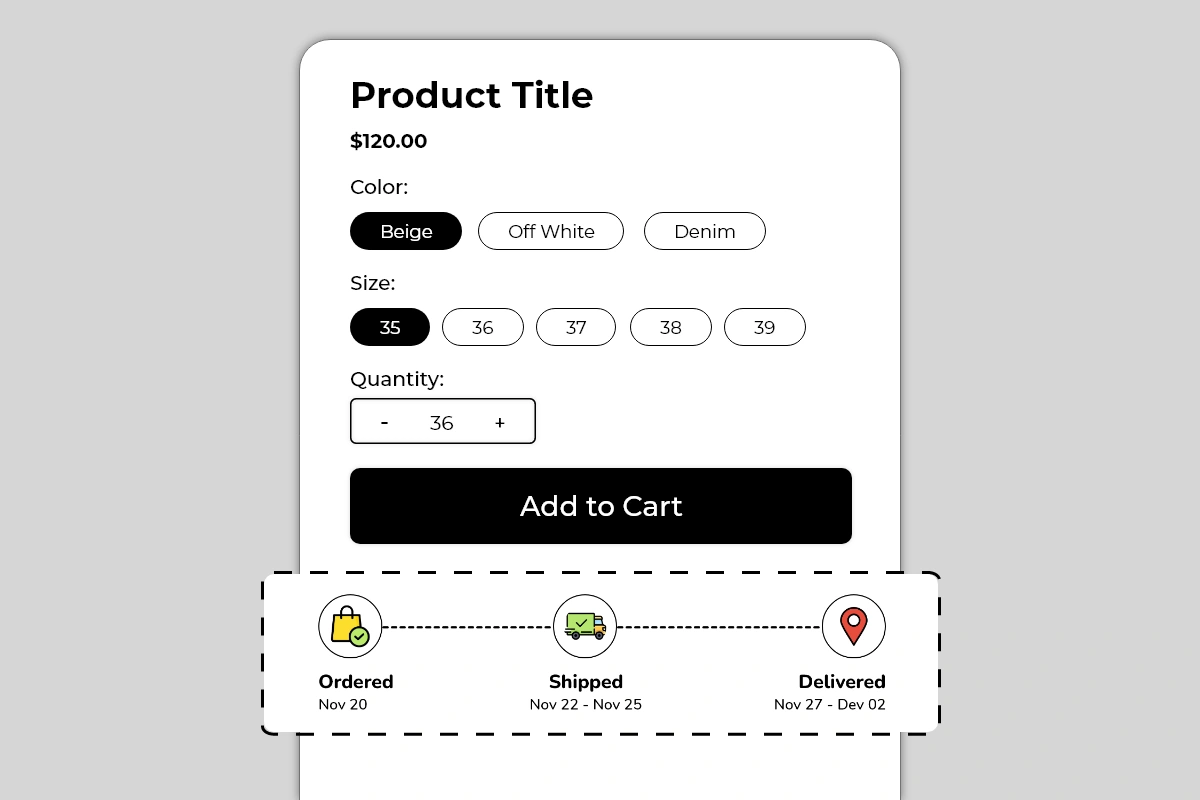
The Delivery Info Block displays a visual three-step shipping timeline directly on your product page. It shows three stages — Ordered, Shipped, and Delivered — connected by a dashed line, with a relevant icon for each stage and a date or date range below each label.
It comes in two visual styles:
Colored style — outlined circular icons with colored illustrations, lighter and more visual
Dark filled style — solid dark circular icons with white icons inside, minimal and high-contrast
Both styles communicate the same information. The right choice depends on your theme's visual tone.
Why It Matters for Conversion
Shipping uncertainty is one of the most documented reasons for product page abandonment. Shoppers want to know one thing before they buy: when will this arrive?
If your product page does not answer that question clearly, shoppers have two options — contact you to ask, or leave to find a store that shows it upfront. Most choose to leave.
The Delivery Info Block answers the shipping question proactively, in a visual format that takes under three seconds to read. A shopper who can see Ordered Nov 20 → Shipped Nov 22–25 → Delivered Nov 27–Dec 02 has no remaining uncertainty about when their order will arrive. That certainty removes one of the most common reasons to delay or abandon a purchase.
How to Add the Delivery Info Block
Go to Online Store → Themes in your Shopify admin
Click Customize on your active theme
Using the top dropdown, open your product template
In the left sidebar, click Add block
Under Apps, select Iconic Blocks → Delivery Info
The block appears in your layout — configure it in the right sidebar
Drag the block to your preferred position in the left sidebar
Click Save
Key Settings
Style Choose between the colored outlined icon style or the dark filled icon style. The colored style works better on light, lifestyle-focused themes. The dark filled style works better on minimal, monochrome, or premium themes. Preview both before deciding — pick the one that feels native to your existing product page design.
Stage 1 — Ordered
Label: Default is Ordered — this can be renamed if your workflow uses different terminology
Date: Set the date the order is typically placed or confirmed — usually today's date or same day for the shopper
Icon: Shopping bag with a checkmark — indicates purchase confirmation
Stage 2 — Shipped
Label: Default is Shipped — rename to Dispatched or Processing if that better reflects your workflow
Date: Set the expected dispatch date range — shown as Nov 22 – Nov 25 in the example, indicating the window within which the order will leave your warehouse
Icon: Delivery truck — indicates the order is in transit
Stage 3 — Delivered
Label: Default is Delivered
Date: Set the expected delivery date range — shown as Nov 27 – Dec 02 in the example, giving shoppers a realistic delivery window
Icon: Location pin — indicates arrival at destination
Icon Style Color For the colored variant, adjust the icon and circle border colors to match your brand. Keep all three icons visually consistent — same style, same weight, same color family.
Connector Line Style The dashed line connecting the three stages is a fixed design element. It communicates the journey from left to right visually. No configuration is needed for this element.
Placement Strategy
Best position: Directly below the Add to Cart button This is the placement shown in Image 1 and the most effective position for this block. A shopper who has just decided to buy — or is on the verge of it — sees the delivery timeline immediately below the Add to Cart button. It confirms that the purchase will arrive within a known, acceptable timeframe and removes the last shipping-related hesitation before they commit.
Second best position: Between the price and Add to Cart button Works well when shipping speed is a key selling point for your store or product — for example, same-day dispatch, express shipping, or time-sensitive gifting products. Showing the timeline before the Add to Cart button makes delivery speed part of the value proposition.
Avoid placing it:
Above the product title — delivery information is a supporting detail, not a headline
At the bottom of the page below descriptions and reviews — most shoppers will not scroll that far before making a decision
Inside an accordion or tab — collapsed delivery info removes the very certainty this block is designed to create
Best Practices
Use realistic date ranges, not aspirational ones. If your standard shipping takes 7 to 10 days, show 7 to 10 days. If you show 3 to 5 days and regularly deliver in 8, you will generate complaints and returns even from customers who received their order. Accuracy builds more trust than speed claims.
Update dates regularly. A block showing November delivery dates in March tells shoppers the store is not maintained. Set a recurring reminder to update the dates in the block every 1 to 2 weeks to keep them current and credible.
Use date ranges, not single dates. A single date (Delivered Nov 27) creates a hard expectation. A range (Nov 27 – Dec 02) sets a realistic window and reduces complaints when delivery falls on day 5 of a 5-day window.
Match the block style to your theme. The dark filled style on a dark or minimal theme looks intentional and designed. The colored style on a light lifestyle theme feels native. A mismatch — colored icons on a dark premium theme — looks out of place and reduces credibility.
Rename stage labels if they better reflect your process. If you have a processing window before dispatch, rename Stage 2 to Processing or Dispatched to accurately represent your fulfillment workflow. Accuracy in the labels builds more trust than defaulting to generic terms.
If you offer express or standard shipping options, consider separate product templates. If delivery timelines differ significantly between shipping options, use separate product templates with different Delivery Info blocks configured for each. Showing one timeline that applies to only one shipping tier can mislead shoppers on the other.
Common Mistakes
Showing inaccurate delivery dates This is the most damaging mistake with this block. A shopper buys based on the delivery window shown, the order arrives later than stated, and they raise a dispute or leave a negative review. Always set dates that reflect your actual average fulfillment and carrier performance — not your best-case scenario.
Never updating the dates Dates that are weeks or months out of date immediately signal that the store is not well-maintained. A shopper who notices the delivery block showing dates from a previous month will question whether the rest of the store information is current. Build a habit of updating the block dates on a fixed schedule.
Using single delivery dates instead of ranges A fixed delivery date creates a hard commitment. Carriers are not always on time. Always use a range to set realistic expectations and protect yourself from complaints when delivery falls within your normal window but not on a specific day.
Choosing an icon style that clashes with the theme Colorful illustrated icons on a dark, minimal theme look inconsistent and reduce the perceived quality of the page. Always preview both style options against your actual product page before publishing.
Setting the Ordered date in the past If the Ordered stage shows a date that has already passed, it creates confusion — the shopper has not ordered yet. Set the Ordered date to reflect when a purchase made today would be confirmed — either today's date, Today, or the next business day.
Troubleshooting
The block is not appearing on the product page
Cause: The block was not saved after being added, or it was added to the wrong product template.
Solution: Go to Online Store → Themes → Customize, open the correct product template, confirm the block is visible in the left sidebar layout, and click Save.
The dates are showing incorrectly or not updating
Cause: The date fields were not saved after being edited, or a browser cache is showing an older version.
Solution: Re-enter the dates in the block settings and click Save. Then open the live product page in a new private or incognito browser window to verify the updated dates are showing.
The icons are not displaying correctly
Cause: A theme CSS conflict is affecting the icon rendering, or the block did not load fully.
Solution: Hard refresh the live page. If icons are still broken, try switching between the colored and dark filled style in the settings and save. If the issue persists, contact Iconic Blocks support with your store URL.
The three stages are stacking vertically instead of showing in a horizontal row on mobile
Cause: This may be expected behavior on very small screen widths depending on the theme layout.
Solution: Preview the block on mobile using the Theme Editor toggle. If the stacking looks unacceptable, shorten the date text in each stage to reduce width. Contact Iconic Blocks support if the layout appears broken rather than just stacked.
The block appears on some products but not others
Cause: Your store uses multiple product templates and the block was only added to one.
Solution: Open each product template in the Theme Editor and add the block to any template where it is missing. Configure dates per template if delivery timelines differ between product types.
The block is visible in the Theme Editor but not on the live store
Cause: Changes were not saved, or the browser is showing a cached version of the page.
Solution: Click Save in the Theme Editor, then open the live product page in a new private or incognito browser window.