

Trust Badges Block
What Is the Trust Badges Block?
The Trust Badges Block displays your store's trust signals — things like free shipping, return policy, and secure payment — directly on the product page in a clear, visual format.
Trust badges exist to answer the hesitation every first-time shopper has before buying:
Is this store legitimate?
What if I need to return it?
Is my payment safe here?
When these questions go unanswered on the product page, shoppers leave to find the answers elsewhere — and most do not come back. Trust badges answer these questions instantly, at exactly the right moment, without the shopper having to look for them.
The block comes in two layout styles:
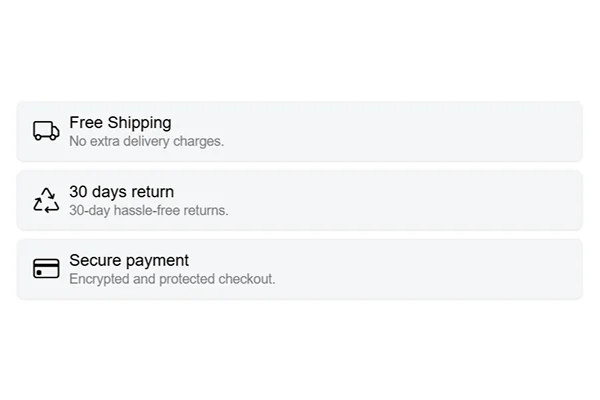
Trust Badges List — a vertical stack of full-width rows, each with an icon, a bold title, and a supporting subtitle
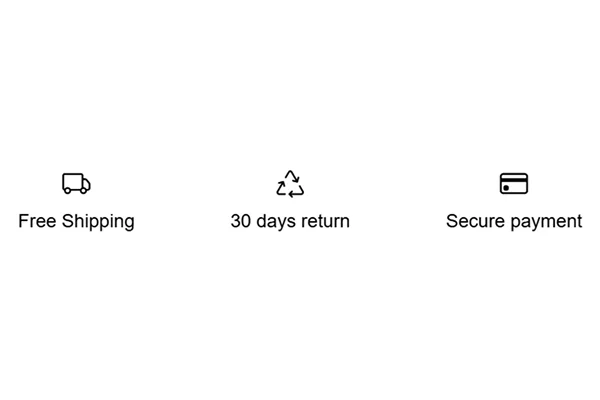
Trust Badges Strip — a compact horizontal row with an icon and a short label per badge, displayed side by side
Why It Matters for Conversion
First-time visitors to your store have no prior experience with your brand. They cannot verify your store's legitimacy the way they can with a physical shop. Trust badges are the fastest way to bridge that gap — they visually communicate that your store is safe, fair, and reliable before a shopper has to take any risk.Stores that display clear trust signals near the Add to Cart button consistently see lower bounce rates and higher conversion rates from first-time visitors — the hardest segment to convert.
Layout 1 — Trust Badges List
What It Looks Like
A vertical stack of badge rows where each row contains:
A colored icon on the left
A bold title in the center (e.g. Free Shipping)
A short subtitle below the title (e.g. No extra delivery charges.)
Each badge sits inside its own light-background card with clear separation between rows
Best for stores that want to give each trust signal its own space and emphasis. Works well when you have 3 to 5 badges and want shoppers to read and absorb each one individually.
How to Add Trust Badges List
Go to Online Store → Themes in your Shopify admin
Click Customize on your active theme
Using the top dropdown, open your product template
In the left sidebar, click Add block
Under Apps, select Iconic Blocks → Trust Badges List
The block appears in your layout — configure it in the right sidebar
Drag the block to your preferred position in the left sidebar
Click Save
Key Settings — Trust Badges List
Icon Each badge row has its own icon. Use icons that are immediately recognizable and directly related to the badge message — a delivery truck for shipping, a shield for security, a return arrow for returns. Colored icons perform better than flat monochrome ones because they draw the eye faster.
Badge Title The bold text for each badge. Keep it under 4 words and make it specific — Free Shipping, 30 Days Return, Secure Payment. Do not use vague labels like Great Service or We Care.
Badge Subtitle A single short sentence that adds one specific detail to the title — No extra delivery charges., 30-day hassle-free returns., Encrypted and protected checkout. This is where you add credibility. Keep it under 8 words.
Number of Badges 3 badges is the most effective number for this layout. It is enough to cover the three biggest purchase concerns — shipping, returns, and payment security — without making the block feel heavy. You can add up to 3.
Card Background Use a light neutral background for each card. The background creates visual separation between badges. Avoid bright or bold colors — the badge content should do the work, not the background.
Layout 2 — Trust Badges Strip
What It Looks Like
A single horizontal row where each badge contains:
A colored icon centered above the label
A short bold label below the icon (e.g. Free Shipping, 30 Days Return, Secure Payment)
All badges displayed side by side in one compact strip with no subtitle text
Best for stores with a minimal theme or limited vertical space on the product page. The strip format is compact, non-intrusive, and works especially well immediately below the Add to Cart button where space is tight but trust signals still need to be visible.
How to Add Trust Badges Strip
Go to Online Store → Themes in your Shopify admin
Click Customize on your active theme
Using the top dropdown, open your product template
In the left sidebar, click Add block
Under Apps, select Iconic Blocks → Trust Badges Strip
The block appears in your layout — configure it in the right sidebar
Drag the block to your preferred position in the left sidebar
Click Save
Key Settings — Trust Badges Strip
Icon Same icon guidance as the List layout — use recognizable, colored icons that match the badge label. In the Strip layout, the icon carries more weight because there is no subtitle to support it. Make sure the icon alone communicates the message clearly.
Badge Label This is the only text per badge in the Strip layout. It must be short and immediately understood — 2 to 3 words maximum. Free Shipping, Easy Returns, Safe Checkout are all effective. Anything longer will crowd the strip on mobile.
Number of Badges 3 badges works best for the Strip layout — one for shipping, one for returns, one for payment. With 3 badges, the strip is balanced and readable on both desktop and mobile.
Spacing Between Badges Control the gap between each badge in the strip. On wider themes, more spacing makes the strip feel premium. On compact themes, tighter spacing keeps it contained. Preview on mobile after adjusting.
Which Layout Should You Use?
Trust Badges List | Trust Badges Strip | |
|---|---|---|
Best for | Stores needing detailed trust messaging | Stores wanting compact, minimal trust signals |
Space used | More vertical space | Minimal vertical space |
Information shown | Icon + Title + Subtitle | Icon + Label only |
Ideal badge count | 3 | 3 |
Works best near | Below Add to Cart | Directly below Add to Cart button |
Mobile experience | Stacks cleanly | Stays in a row or wraps neatly |
If you are unsure, start with the Strip layout. It is less intrusive, works on almost any theme, and can be placed directly below Add to Cart without disrupting the page flow. Upgrade to the List layout if you find shoppers still have trust-related questions or hesitations after seeing the strip.
Placement Strategy
Best position for both layouts: Directly below the Add to Cart button This is the single most important placement for trust badges. A shopper reads the product title, sees the price, selects their variant, and is about to click Add to Cart. At that exact moment, a visible trust signal — Free Shipping, 30 Days Return, Secure Payment — removes the last hesitation and confirms the purchase is safe.
Second best position: Between the price and Add to Cart button Works well on product pages where the Add to Cart button is lower on the page or where the shopper needs trust confirmation before they even reach the button.
Avoid placing it:
At the bottom of the product page — below the description, tabs, and reviews — where most shoppers will never scroll to
Above the product title — it disrupts the reading flow before the shopper even knows what the product is
Inside an accordion or collapsed section — hidden trust signals have no conversion impact
Best Practices
Cover the three core concerns every time — shipping, returns, and payment security. These are the three questions every first-time shopper has. If your badges do not address all three, you are leaving hesitation on the table.
Be specific in your subtitle text. 30-day hassle-free returns is more convincing than Easy Returns. Specificity signals that the policy is real, not just marketing language.
Use colored icons, not plain black ones. Color draws attention faster and makes each badge visually distinct from the others. Plain icons in the same color as body text tend to blend into the page.
Make sure your badges reflect real policies. If your badge says Free Shipping but your store charges for shipping, it damages trust the moment a shopper reaches checkout. Every badge must reflect an actual store policy.
Do not use both layouts on the same product page. Use one or the other. Displaying the same trust information twice in two different formats looks repetitive and reduces the credibility of both.
Check mobile layout before publishing. The Strip layout especially needs to be verified on mobile — badges should remain readable and evenly spaced at small screen sizes.
Common Mistakes
Using badges that do not match actual store policies Displaying Free Shipping when you charge for shipping, or 30 Days Return when your policy is 7 days, creates a trust problem the moment the shopper hits checkout. Badges must always reflect real, current policies.
Using vague badge labels Great Service and We Care About You communicate nothing specific. A shopper cannot act on these. Every badge should address a concrete concern — shipping cost, return window, or payment safety.
Adding too many badges More than 5 badges in the List layout or more than 3 in the Strip layout makes the block feel cluttered and reduces the impact of each individual signal. Less is more — prioritize the badges that remove the biggest objections.
Placing badges too far down the page Trust signals only work if shoppers see them before they decide to leave. If they are below the fold or after a long product description, they are not doing their job. Place them in the active decision zone — near the price and Add to Cart button.
Using inconsistent icon styles Mixing flat icons with colored illustrated icons, or using icons of very different visual sizes, makes the block look unprofessional. Choose one icon style and apply it consistently across all badges.
Troubleshooting
The block is not appearing on the product page
Cause: The block was not saved after being added, or it was added to a different product template than the one your products use.
Solution: Go to Online Store → Themes → Customize, open the correct product template, confirm the block is visible in the left sidebar layout, and click Save.
Badges appear on some products but not others
Cause: Your store has multiple product templates and the block was only added to one.
Solution: Open each product template in the Theme Editor and add the block to any template where it is missing.
Icons are not showing
Cause: The icon file was not uploaded correctly or the format is not supported.
Solution: Use PNG or SVG format. Re-upload the icon in the block settings. If the problem continues, clear your browser cache and try again.
The Strip layout is wrapping awkwardly on mobile
Cause: Too many badges in the strip, or badge label text is too long.
Solution: Reduce to 3 badges and shorten each label to 2 to 3 words maximum. Preview on mobile in the Theme Editor after each change.
The block is visible in the Theme Editor but not on the live store
Cause: Changes were not saved, or the browser is showing a cached version of the page.
Solution: Click Save in the Theme Editor, then open the live product page in a new private or incognito browser window to see the updated version.