Pro plan block. The Product Options Block is available on the Pro plan. Free plan stores will see this block locked in the Theme Editor until they upgrade.
What Is the Product Options Block?
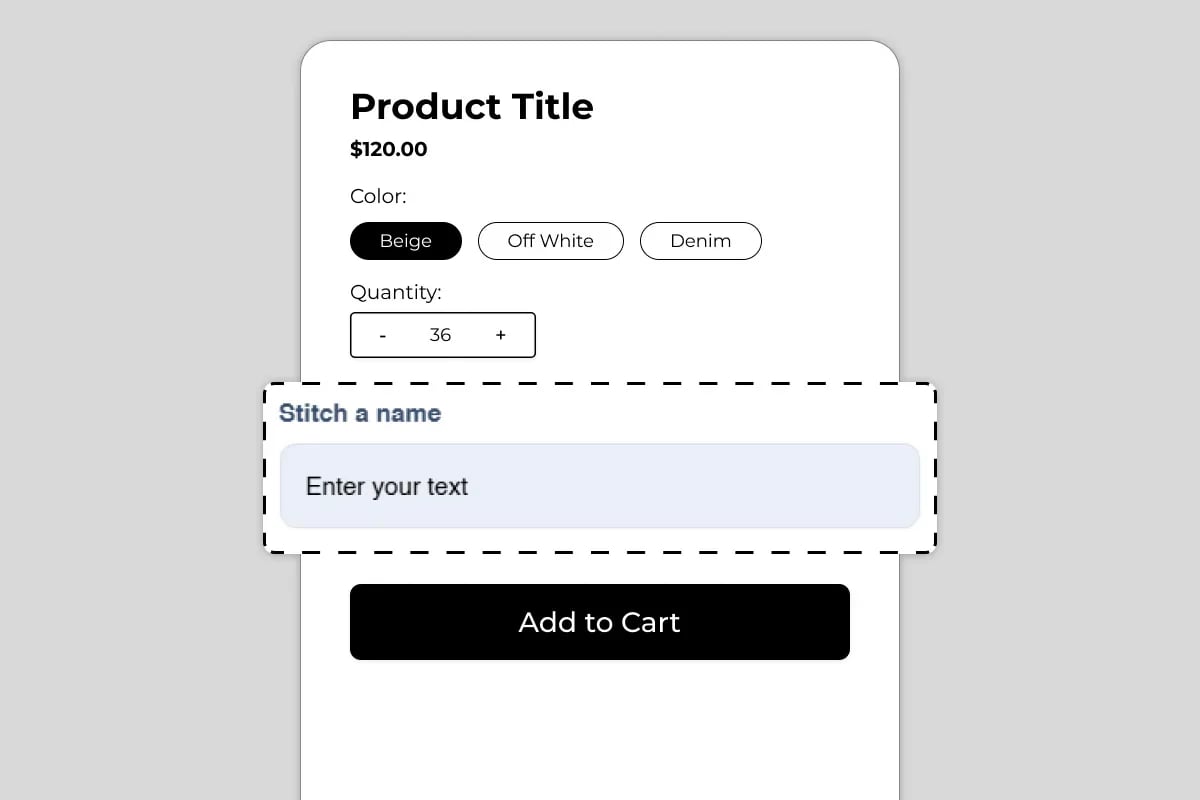
Available Field Types
The block is not a single input — it is a library of field types that you mix and match per product, based on what information you need to collect: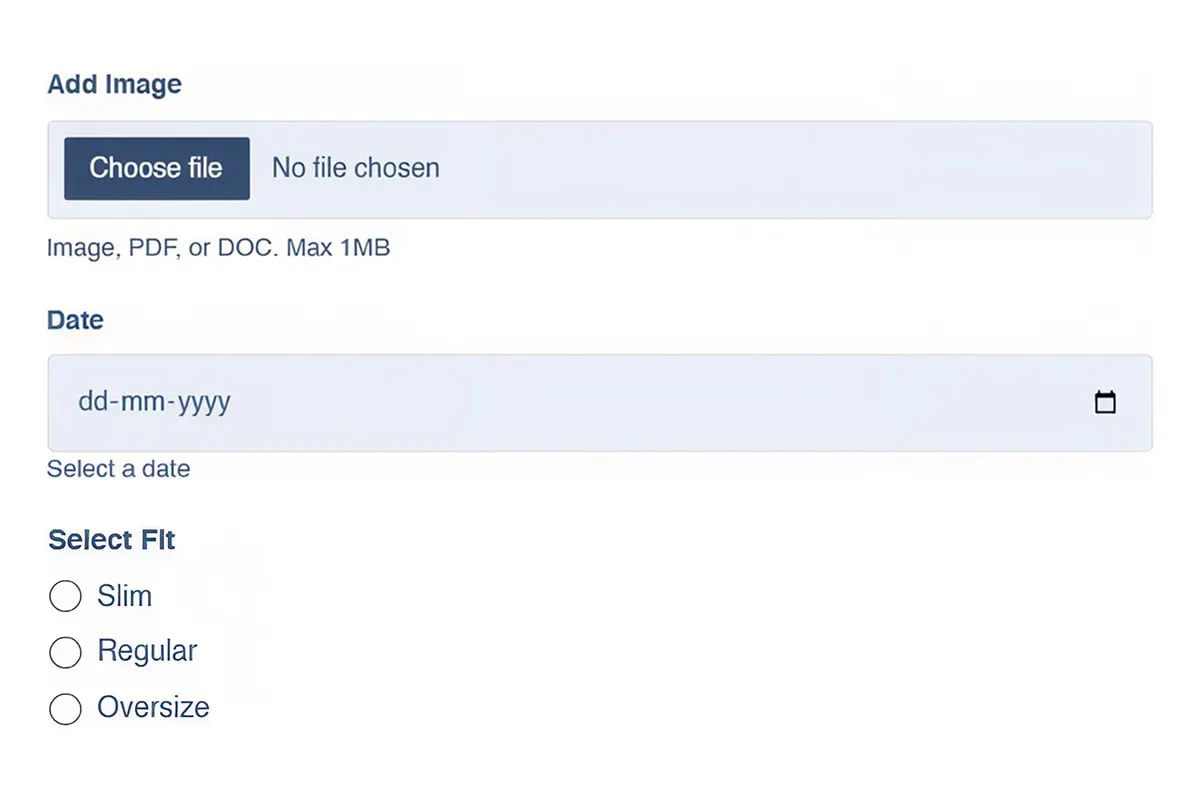
- Text Field — a free-text input such as Stitch a name, a monogram, a gift message, or custom engraving text
- Image / File Upload — lets the shopper upload an image, PDF, or document (for example, a photo to print or a design reference). Supports a configurable file type and size limit
- Date Picker — a calendar date field for delivery dates, event dates, or appointment scheduling
- Radio Buttons — a single-choice selector presented as a list, such as Select Fit: Slim / Regular / Oversize
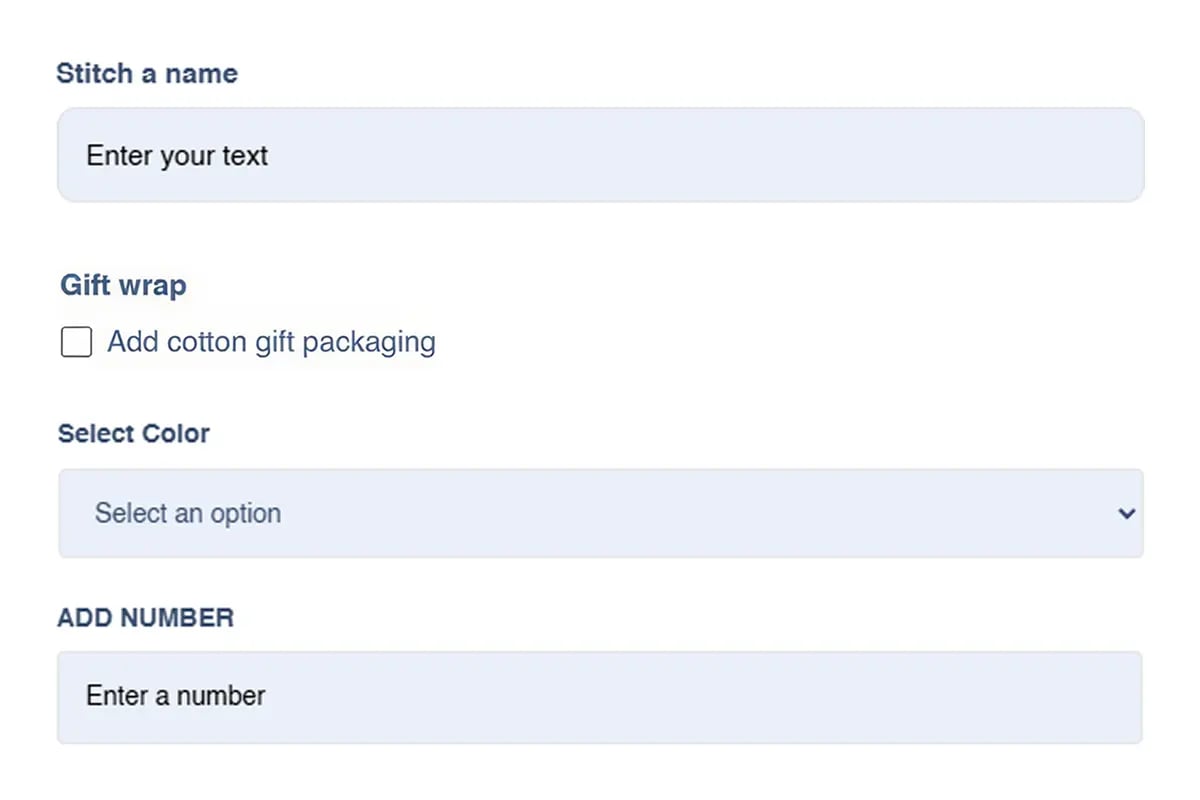
- Checkbox — a single toggle for binary add-ons, such as Add cotton gift packaging
- Dropdown / Select — a single-choice selector presented as a collapsed menu, useful when there are more options than a radio list should reasonably show, such as Select Color
- Number Input — a numeric field for quantities, measurements, or custom specifications, such as engraving a number or collecting a custom size in centimeters
How Order Capture Works
This is the core use case of the block: whatever the shopper enters becomes visible on the order.- The shopper fills in one or more fields on the product page — for example, typing a name into Stitch a name
- The shopper clicks Add to Cart — the entered value is attached to that specific line item as a property
- The value travels through cart and checkout unchanged, exactly as entered
- Once the order is placed, the merchant opens Shopify Admin → Orders → [Order] and sees the custom input listed directly under that line item — for example, Stitch a name: “Alex”
- Fulfillment staff can read the requested customization directly from the order, with no need to cross-reference a separate form or spreadsheet
Why It Matters for Conversion and Operations
Products that require customization often lose sales when the customization process is clunky — a separate form, a note in a cart comment box, a follow-up email asking “what name would you like engraved?” Each extra step is a chance for the shopper to abandon the purchase or for the detail to get lost. This block solves both sides of the problem:- For the shopper: customization happens in the same flow as adding to cart — no extra steps, no separate forms, no waiting for a follow-up email
- For the merchant: every customization request arrives attached to the order automatically, in a structured and readable format, eliminating manual data entry and reducing fulfillment errors
How to Add the Product Options Block
- Go to Online Store → Themes in your Shopify admin
- Click Customize on your active theme
- Using the top dropdown, open your product template
- In the left sidebar, click Add block
- Under Apps, select Iconic Blocks → Product Options
- The block appears in your layout — configure it in the right sidebar
- Add one or more field types and configure each one individually
- Drag the block to your preferred position in the left sidebar
- Click Save
Key Settings
Field Type Choose from Text Field, Image/File Upload, Date Picker, Radio Buttons, Checkbox, Dropdown, or Number Input for each field you add to the block. Field Label The heading shown above the field — for example, Stitch a name, Add Image, Date, Select Fit, Gift wrap, Select Color, or ADD NUMBER. Make this a clear, specific instruction rather than a generic label. Placeholder Text The hint text shown inside an empty field — for example, Enter your text, No file chosen, dd-mm-yyyy, or Enter a number. Use this to show the expected format, especially for dates and numbers. Helper Text An optional line of guidance below the field — for example, Image, PDF, or DOC. Max 1MB under the file upload field, or Select a date under the date picker. Use this to set expectations and reduce input errors. Required Toggle Marks the field as mandatory before the shopper can add the product to their cart. Use sparingly — required fields on every option add friction. Reserve this for information that is genuinely necessary for fulfillment. Options List For Radio Buttons and Dropdown field types, define the list of selectable choices — for example, Slim / Regular / Oversize for fit, or your available color names for a color selector. File Type and Size Limit For the Image/File Upload field type, configure which file types are accepted (image, PDF, or DOC) and the maximum file size — shown to the shopper as helper text (for example, Max 1MB). Price Adjustment Optionally attach a price change to a specific option or checkbox — for example, charging extra for gift wrap or a premium customization choice. Leave at zero for options that do not affect price. Character Limit For Text Field and Number Input, set a maximum input length to prevent excessively long entries that may not display cleanly on the packing slip or order page.Choosing the Right Field Types for Your Product
Not every product needs every field type. Match the field to the actual information required for fulfillment:- Personalized or engraved goods → Text Field (for the name or message) plus Character Limit
- Custom print or photo products → Image/File Upload with a clear file type and size limit
- Appointment-based or made-to-order items with a lead time → Date Picker, paired with helper text explaining lead time
- Products with a fit, size, or style choice beyond standard variants → Radio Buttons or Dropdown, depending on how many choices exist
- Optional paid add-ons → Checkbox, with a Price Adjustment if the add-on carries a cost
- Custom measurements or quantities → Number Input with a sensible character limit and helper text showing the expected unit
Placement Strategy
Best position: Directly above or below the variant selectors (color, size) Shoppers configure the standard product options and the custom options together, as one continuous decision, before reaching Add to Cart. Also effective: Directly above the Add to Cart button Ensures the shopper sees and completes every required field immediately before the point of purchase, reducing the chance of submitting an order with incomplete customization. Avoid placing it:- Below the Add to Cart button — shoppers may add to cart before noticing a required customization field, leading to incomplete orders or cart abandonment when they have to scroll back up
- Far from the other product options — scattering configuration fields across the page makes the overall decision feel more complicated than it is
Best Practices
- Only require fields that are truly necessary. Every required field is a point where a shopper can hesitate or abandon. Make optional what can reasonably be optional.
- Write field labels as instructions, not nouns. Stitch a name tells the shopper exactly what to do. Name alone is more ambiguous.
- Use helper text to prevent input errors, especially for dates, file uploads, and numbers — stating the expected format or limit upfront avoids failed submissions and support requests.
- Keep the options list short for Radio Buttons. More than 4 to 5 choices reads better as a Dropdown. Reserve Radio Buttons for short, mutually exclusive choices where seeing every option at once is helpful (such as fit).
- Set realistic file size limits. A 1MB limit works for most reference images; raise it only if your fulfillment process genuinely requires higher-resolution uploads.
- Review submitted custom input regularly during fulfillment to confirm shoppers are entering usable values (legible names, valid dates) and adjust field guidance if a pattern of unusable input appears.
Common Mistakes
Making every field required This adds friction to every single purchase, not just the ones where customization matters. Required fields should be the exception, not the default. No character or file size limit An unrestricted text field can receive excessively long input that breaks the order page layout or packing slip. An unrestricted file upload can slow down checkout or fail silently on large files. Always set sensible limits. Vague field labels A label like Option 1 gives the shopper no idea what is being asked for. Every field label should read as a clear, specific instruction. Not checking the order page after launch Merchants sometimes add this block but never verify how the captured data actually displays on the order. Place a test order yourself after setup to confirm the information appears clearly in Shopify Admin → Orders. Using a Date Picker without lead time guidance If the product has a minimum turnaround time, state it in the helper text (for example, Orders placed after the 20th ship the following month) so shoppers do not select an unrealistic date.Troubleshooting
The entered value is not showing on the order- Cause: The field may not have been filled in before the shopper clicked Add to Cart, or the block was not properly configured as a line item property.
- Solution: Place a test order with each field filled in and confirm the values appear under the line item in Shopify Admin → Orders → [Order]. If values are still missing, contact Iconic Blocks support.
- Cause: The file exceeds the configured size limit, or is not one of the accepted file types.
- Solution: Confirm the file is within the size and type limits shown in the helper text. Test with a smaller file. If the issue continues on valid files, contact Iconic Blocks support.
- Cause: The Required Toggle was not enabled for that field.
- Solution: Go to Online Store → Themes → Customize, open the block settings for that field, and confirm the Required Toggle is switched on, then Save.
- Cause: The price adjustment setting was not saved, or the shopper did not select the option it is attached to.
- Solution: Verify the Price Adjustment value is set on the correct field or checkbox and confirm the change was saved. Test by selecting the option and checking the cart total.
- Cause: Changes were not saved, or the browser is showing a cached version of the page.
- Solution: Click Save in the Theme Editor, then open the live product page in a new private or incognito browser window.